Little CNC Machine
Jump to navigation
Jump to search
Permitted applications
Extracted from manual, to be reworked into more definitive list.
- Printed circuit boards and front plates
- One sided and double sided boards
- FR3
- FR4
- FR5
- G10
- One sided and double sided boards
- Flexible substrates
- RF substrates
- Drilling test adapters
- Structuring film patterns
- Solder frames for PCB assembly
- SMD fine line
- Contour milling
- Engraving front panels or labels
- Depth drilling of rigid or flexible boards
- Depanelling and reworking of populated and unpopulated boards
- Machining of housings
- Multilayer PCBs up to 8 layers
Startup procedure
The machine is quite picky about the startup order of operations, if you follow the below you should have success in loading the software with a good connection to the machine.
- Power the 4 way strip
- Ensure the compressed air connector is connected and pressurised
- Power on the PC if off
- Switch OFF the mill at the switch to the right by the power connector
- Load the Boardmaster software from the shortcut on the desktop
- Splashscreen appears - wait for 10-20 seconds for the connection failure dialogue to appear
- Ensure COM1 is selected and power on the CNC
- Select connect
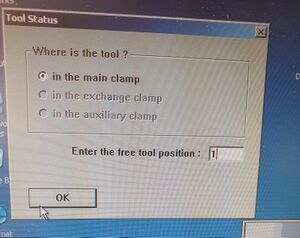
- In the dialogue that appears:
- Select "In the main clamp"
- Enter "1" in "Enter the free tool position"
- Click OK on remove tool to toolbox
- Machine will locate tool 1 then relocate to home and the software loads ready to use
Troubleshooting
- No gas pressure
- Connect gas hose
- Ensure compressor is on
- The gas pressure requirement is quite high, run the air to trigger the compressor to achieve sufficient pressure
