3D Printing
Please refer to the 3D printing Risk Assessment on the SoMakeIt Member Induction Pages.
We have several 3D Printers of various size and capability in the space that you can use listed in Printers. If you would like to use a printer, come by the space when it's open and ask if a printer is available and if someone can show you how. If you want to be assured of printer availability and assistance please check Slack channel (#3D-PUG).
A volunteer will be able to suggest the best printer to use for your thing and how to complete the process of printing it. Printing with Cura is a good place to start.
Filament storage
Please ensure all filament is kept in plastic bags with a desiccant sachet when not in use as filament is highly hygroscopic. If filament is performing poorly due to moisture, you can use the filament dryer.
Printers Overview
SoMakeIt has various 3D printers in various states of repair and difficulty level to use. In approximate difficulty order (from least to most) they are
FDM Printers (Fused Deposition Modelling - using strands of plastic filament such as PLA or ABS - the most common type of 3D printing)
- A Bambu A1
- A Prusa
- Lulzbot TAZ 6s - Larger build area (250x250) than the minis, can be setup with an SD card with CGode sliced in Cura or with Octoprint. one of the 6's is setup with a larger hardened steel nozzle and can be used for faster, lower detail printing as well as flexible filament prints
- Cerberus Delta - SDCard and not dimensionally accurate. can only print PLA. Slic3r profile is available in Github.
- Cube Pro - Currently undergoing conversion. Not available for use.
Lulzbot minis - Small (150x150) build area but easy to use. Can be driven with a laptop running Cura or via Octoprint. One is fully functional and available for use and one other is set up for flexible filament material (but is currently experiencing problems)(Currently only used for events).- Lulzbot TAZ 3 - Not recommended for general use. Needs to be driven from an SDCard with CGode sliced in Cura
SLA Printers (Stereolithography or Resin printing - "pulls" a model out of a vat of liquid resin. good for small, high detail parts such as figurines)
These printers require an induction.
- Elegoo Mars with wash and curing station
Full details can be found on the 3D Printers Models page
Printing overview
Printing in general steps goes:
- Create or download 3D model (ensuring it's .STL format)
- Slice the model into CGODE (specific to the printer) with a slicer.
- Prepare the printer (ensure the printer is operational and clean)
- Load the sliced GCODE onto the printer (using on-board SDCard reader, Octoprint or direct USB connection.
- Print!
There is a different workflow for the resin printer but it broadly follows the same general steps.
1. 3D Model
- Create a 3D model
Use a 3D CAD or modelling package to create your model. Typical free options are Tinkercad, Fusion 360, OpenSCAD and Blender, though there are many other options. See the infographic below for an overview of options and their relative strengths and weaknesses.
- Download a 3D file.
There are a number of 3D file download sites, the most popular are Thingiverse, Printables and Cults3D. many are free, some are paid. make sure to download a .STL or .3MF file otherwise you may need to convert your download before use.
2. Slice the model
Before your 3D file can be printed, the stl has to be converted into instructions that the 3D printer can understand, AKA G-CODE. The printer prints one layer or slice at a time so this is called slicing. The exact method of slicing can be printer specific but as most of the printers in the space are Lulzbot ones, it is highly recommended to slice/print with the Lulzbot specific version of Cura. For the Cerberus Delta printer, slicing is recommended to be done with Slic3r or Prusa Slicer. The profile for Slic3r (also works with prusa slicer as prusa slicer is forked from slic3r) can be found on our github page
3. Prepare the printer
The exact preparation of the printer is dependant on the surface of the build platform and the material you are printing. The space printers will either have bare glass or PEI as the sheet.
Bare glass can be printed directly onto with PLA material as long as it's clean and dry. A thin layer of glue stick will also promote correct adhesion, but isn't necessary for PLA. If the glue stick layer has seen several uses, then it can be cleaned off and re-applied or moistened with a light pass of a damp cloth and a rub to re-distribute the glue. ABS and flexible filaments such as ninjaflex require extra adhesive, specifically glue stick.
If the build plate is PEI, then additional care must be taken. ABS and PLA will both print directly on the surface but it must be super clean. A quick wipe with Isopropyl Alcohol is usually enough. If you are printing with PETG or Ninjaflex/TPU however, glue stick is still required otherwise they can damage the PEI layer on part removal.
The TAZ 6 printers perform auto bed levelling at the start of the print. This is achieved by the printer touching the hot-end to each corner of the bed where it makes an electrical contact with the 4 plates. It frequently encounters an issue with poor contact and will push down harder than it should to make the contact, which is easily observable. This will cause the bed level to be recorded lower than it should and your prints will fail. You should watch the start of each print and if you observe the poor contact behaviour, stop the print, clean the hot-end and plates and try again.Here is a video showing what successful auto-levelling looks like: File:Tazautolevel.webm The nozzle shouldn't push down onto the bed any harder than this.
Keep watching until at least the first layer is down, ideally check again after the first 3, this is where most failures will occur or be evident.
4. Load G-CODE
Once the model has been sliced, the G-CODE file must be transferred to the printer. this can be done through the built-in SDCard reader (if it has one - The Mini's do not), direct connection through USB from Cura or via Octoprint.
- SDCard
For the printers that have an SDCard slot, copy the created *.cgode file from the computer to the SDCard (Cura will prompt to save to removable media if it's inserted), then insert the SDCard into the printer. The menu will have a top level item: "Print from SDCard"
- Drive from Cura via USB
The Taz 6's and the mini's have USB ports and can be driven directly from the computer through Cura. if the printer is connected when slicing is complete Cura will display an option to start printing.
- Octoprint
Most of the printers have an attached Raspberry Pi acting as an octoprint server. You connect to the Octoprint server by pointing a web browser to the appropriate octopi instance attached to the printer you need e.g. taz1 is http://taz1 The login for Octoprint is the same as the space WiFi.
The detailed instructions for using Octoprint and Remote Printing
5. Print!
You will have slightly different print instructions depending on if you're printing off the SDCard, directly from Cura or from Octoprint.
Watch that first layer, also watch the next couple if possible, this is where the errors happen.
Changing filament
You will need to heat the nozzle first.
On TAZ6: You can either navigate to the filament changing menu to automate the process or heat up the nozzle to a typical printing temperature. Once the nozzle is hot, disengage the filament clutch (by first slackening the thumbscrews) and gently pull the filament out. Reverse the steps with new filament. You will want to purge filament with a hot nozzle until the filament starts coming through.
Pricing
We charge £0.04 per gram for any printed plastic you take away with you, you don't pay for any failures if you put them straight into the fail jar. You do pay for support material. There is a scale next to the printers that you can use to weigh your parts after printing.
Estimating Cost
After you slice your part, and before you print it, you can look for the following line in the gcode file:
; filament used = 2139.9mm (15.1cm3)
- PLA weighs 1.4g/cm3, so the part above is 21.14g and £0.85.
- ABS weighs 1.0g/cm3, so the part above is 15.1g and £0.61.
PLA printing on the TAZ6 printers is currently free of charge.
Printing large things
One printer is currently set up with a webcam for print monitoring. If you leave prints unattended you should remote monitor your print with Octoeverywhere. There is a large light-blue bin for placing completed parts when the next printer user comes along.
Some Advice
- If you are looking for help with 3D printing a thing try and arrive with a model in STL format, as modelling a thing often takes longer than actually printing it so don't expect to be able to do both on the same day.
- Some things can't really be printed on our FFF Type printers, or need support material to be printed with them and removed later. An expert at the space will be able to advise you about what can print and what won't work so well. Generally the only restriction is "you can't print on top of air"... We can do overhangs a bit past 45 degrees (see the design rules infographic below) and we can bridge over large gaps if the bridge is flat.
- A good resource to check if your thing is print friendly is the 3D Printing Design Rules document
- More helpful resources here:
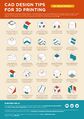
More guidelines for designing for 3D Printing
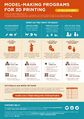
Simple guide for what 3D package is suited to what task. others to consider: OpenSCAD if you prefer a programming like interface
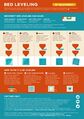
Check this for common causes of first layer problems


- Make sure you bag unused filament so it does not absorb moisture
- If you remove filament from the printers, use feed the end of the filament through the holes on the spool to prevent it from forming knots.
Print Queue
So Make It generally has enough printers to satisfy demand, however if you think you might need a specific printer or capability and want to ensure it's available on your visit, please mention it on the 3D printing slack channel: #3D-pug, however we don't operate a formal queue.